Guides / ITTC Workflow (ver 2.1)
Description
This guide describes our process for tasking, downloading, processing, and publishing high-resolution commercial satellite imagery for Imagery to the Crowd.
- Downloading Imagery:
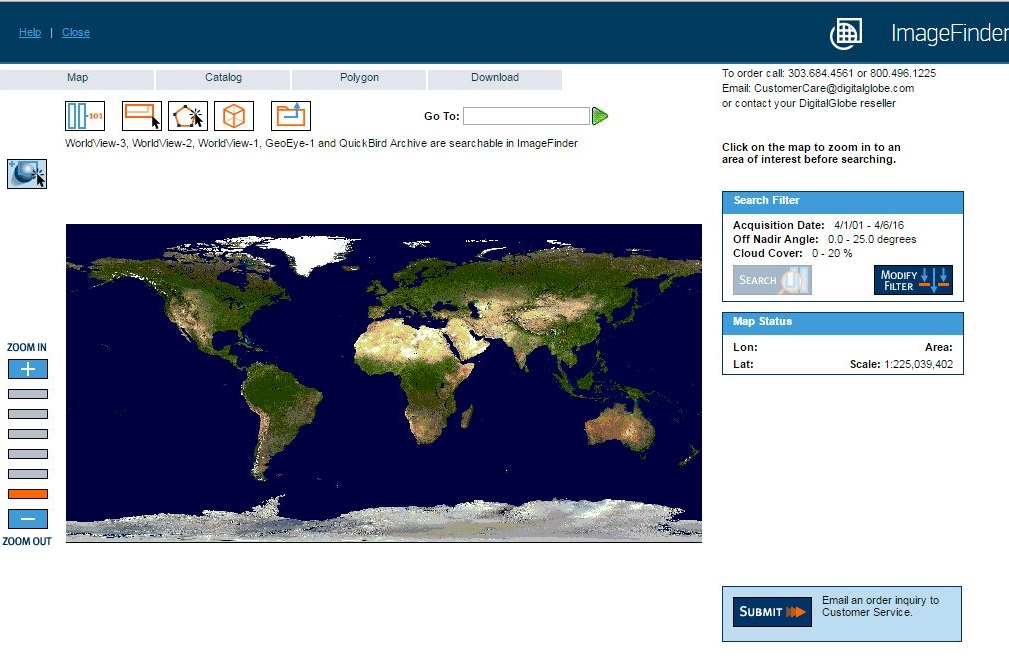
- To browse locations and imagery metadata being requested, go to www.browse.digitalglobe.com.
Other good options to search for available imagery are Apollo Image Hunter and discover.digitalglobe.com
-
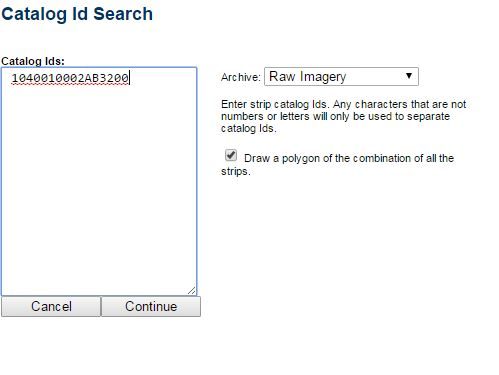
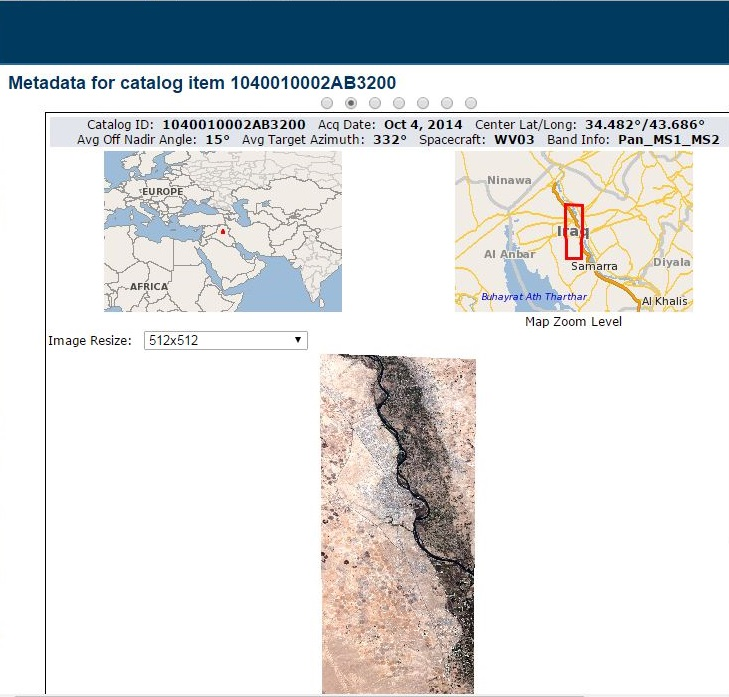
To search by catalog id numbers, the most common method, click “Catalog”. Once you enter your id number, a popup window will appear. You may need to disable your popup blocker if you have one enabled.
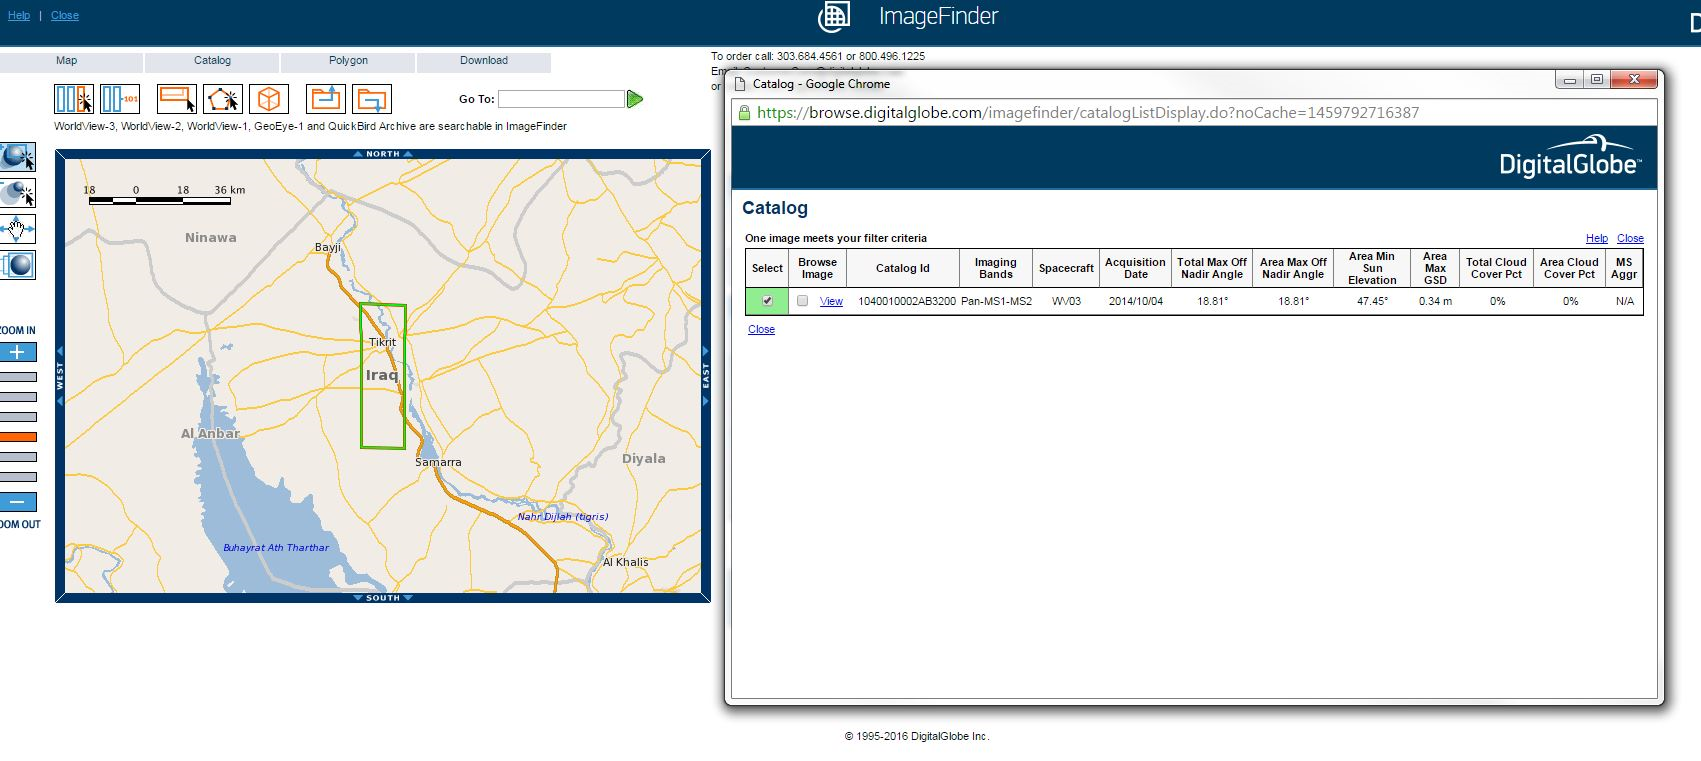
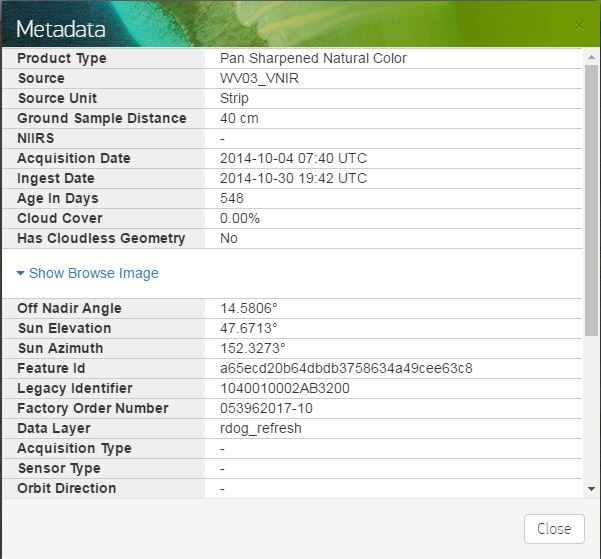
- Here you can view the requested imagery’s metadata. You will need to copy the “Center Lat/Long”. For this location, it is 34.482/43.686. You will also need to remember the specific imagery acquisition date, “Acq Date”. In this case, it is Oct 4, 2014.
- Now, open another tab in your internet browser, and go to https://evwhs.digitalglobe.com.
- Enter your username and password. Do not forget to accept the terms of use.
-
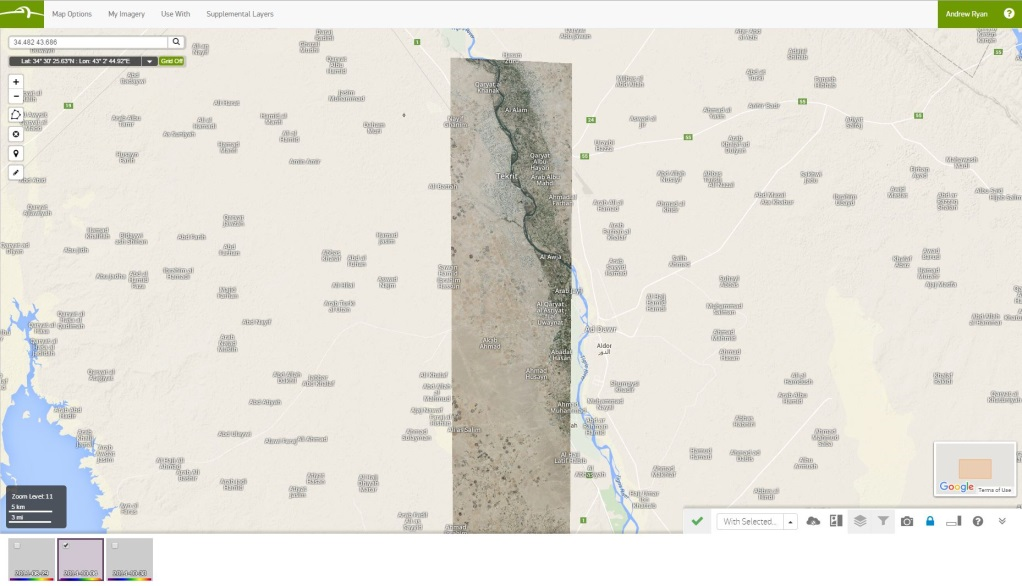
Now that you’re logged in, click the search bar and the Center Lat/Long you just copied (without the slash).
-
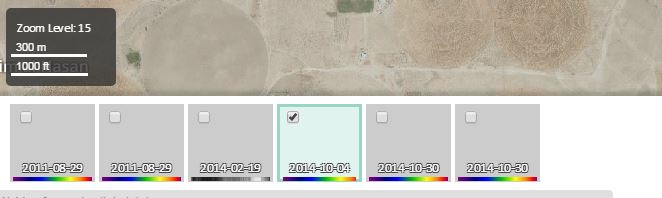
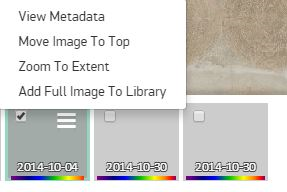
Hover over the tile with the correct date: 2014-10-04. When the three bars appear, click them, and select “View Metadata”.
- Once the above popup appears, verify the imagery Catalog ID and “Legacy Identifier” corresponds to one another.
- Once you verify the selected imagery is the correct one you are looking for, hover over the tile again and click the three bars. Then click the option that says “Add Full Image to Library”.
- The imagery may take a while to download to your library, but once it has finished, use the Aspera Connect plugin to download the imagery to the Ubuntu machine. Make sure to use the Turbo download option to download the imagery quicker. The imagery should the automatically be downloading to the machine in the “ittc_ssd_processing” folder.
- To browse locations and imagery metadata being requested, go to www.browse.digitalglobe.com.
- Merging Imagery Tiles:
- To process your imagery, you will need to open the Vagrant OSMBox. You need to work in the virtual machine to process the imagery because you do not have access to the same software (QGIS) as the host machine and it also saves space/memory by working in the virtual machine. To boot the virtual machine, open the terminal of the host machine (in the search bar, start typing “terminal”, it should immediately appear).
- When the terminal is open, run the following commands to boot:
cd .. vagrantcd osm boxvagrant up - Also, where you can, you should always utilize the Tab key when typing in the terminal because it auto-completes what you are typing (if it exists). For example, if I am trying to move to the ittc_ssd_processing folder, and I start typing “ittc_” and then tab, it will auto-complete the rest of the folder name.
- When the file is completely downloaded, extract the zip folder in “ittc_ssd_processing”. Open the unzipped folder, and find the subfolder that ends with TILE_SHAPE, extract this folder.
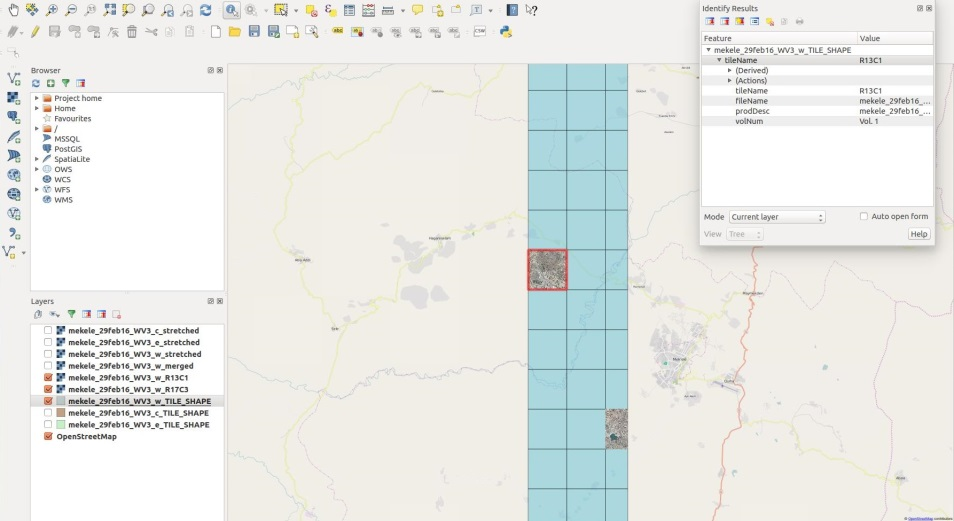
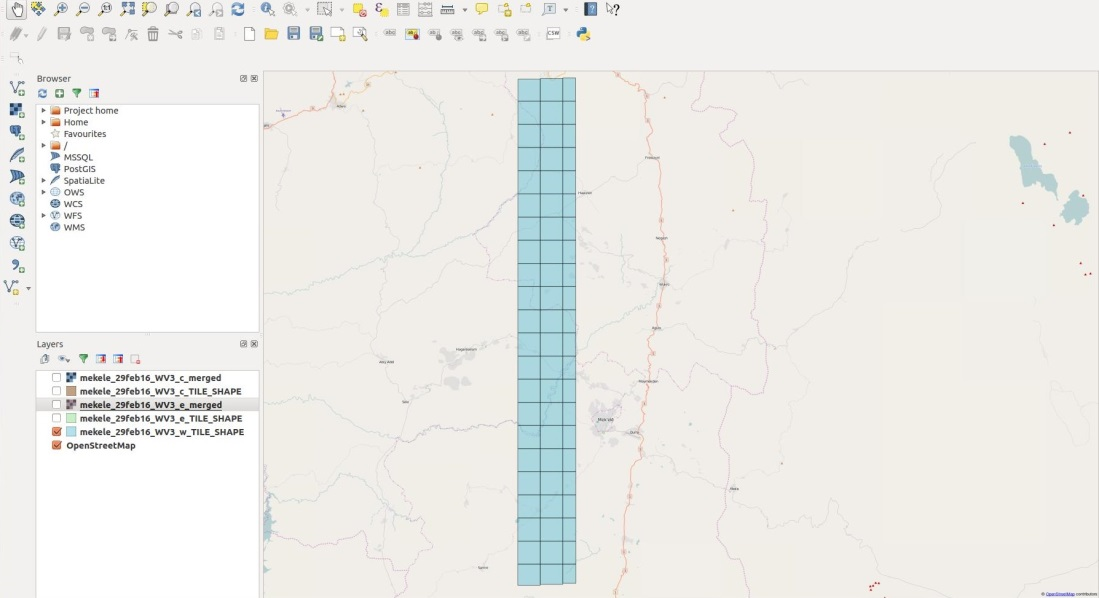
- Open QGIS and import or drag/drop the .shp file from the extracted folder that ends with TILE_SHAPE. This shapefile is the shape/outline of the imagery you are working with. If you have the OpenLayer plugin in QGIS, you can turn on the OpenStreetMaps basemap. Turning it on allows you to ensure your imagery is in the correct location, and can also assist in identifying which tiles you will want to merge if you are not going to process the entire strip.
- Again, you may not need to process the entire strip if the area of interest is very narrow. In this case, we will only be processing the imagery around Mekele.
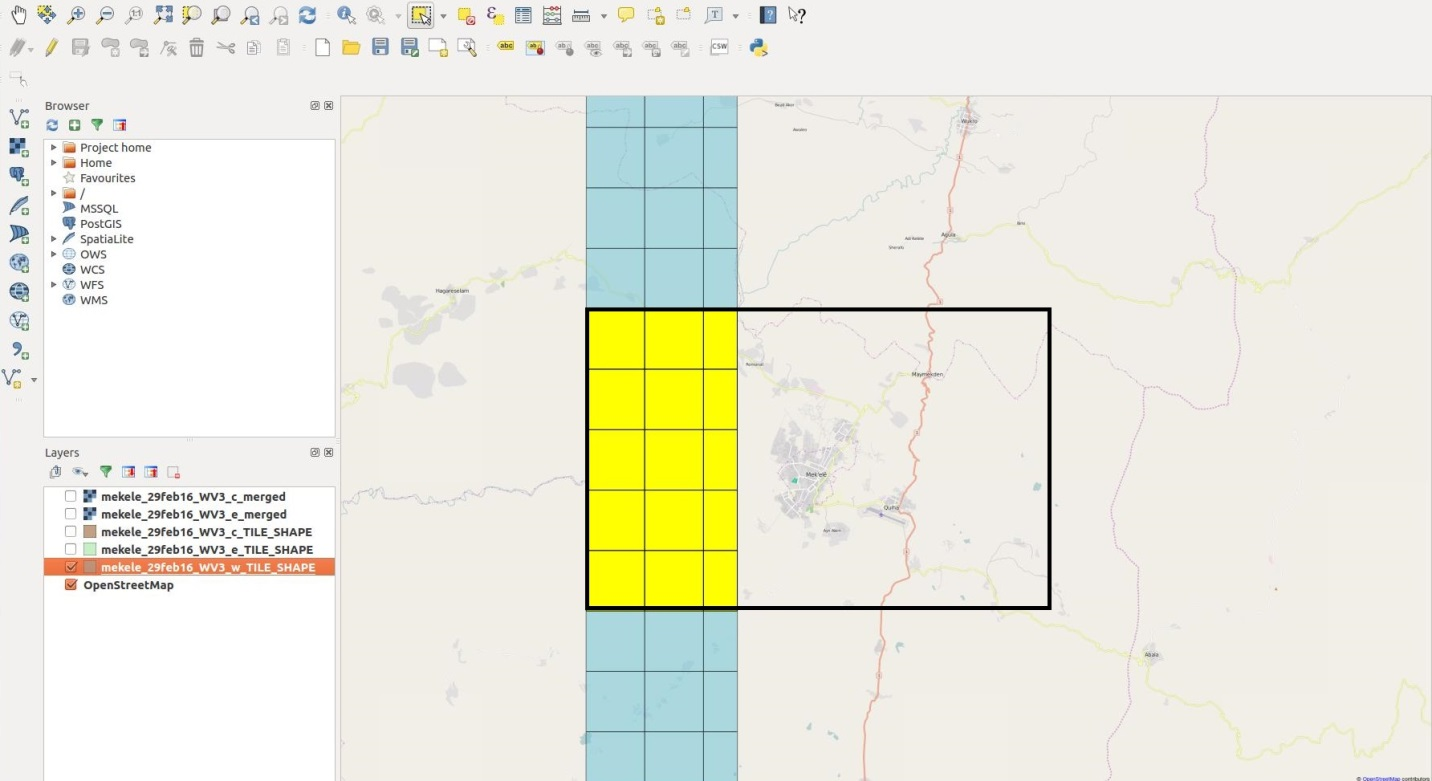
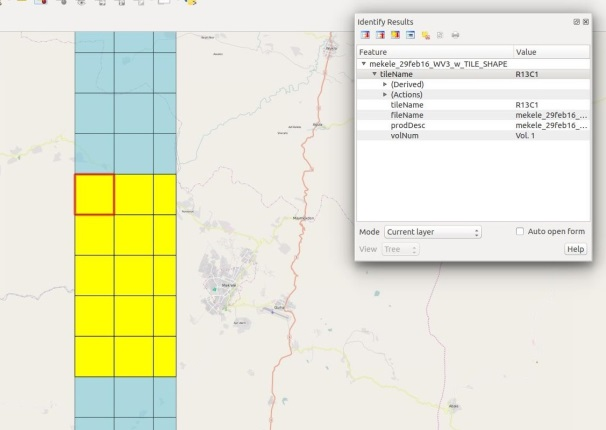
- In QGIS, use the identify tool to select the top left, and bottom right tiles in the viewing area. This will give you the first and last tiles you will be selecting for processing. In this case, we will use tiles R13C1 through R17C3. R stands for Row, and C stands for Column.
- Next you will merge the tiles. In the QGIS menubar:
- Go to the Raster menu
- then the Miscellaneous submenu
- click on Merge
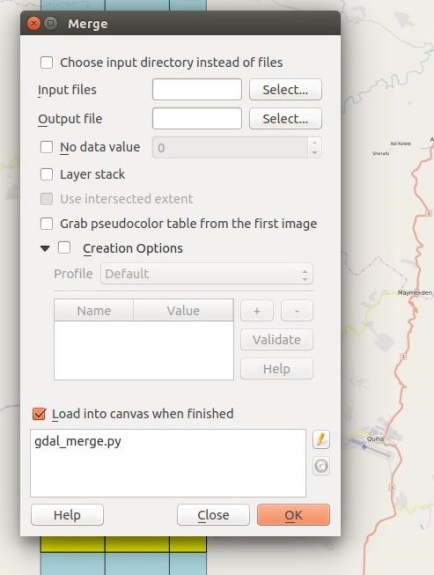
- In the Merge window, click on the select button next to Input files, then select all the tiles in range you will be processing.
- Click on the select button next to Input files, save as a Erdas.img, and use the following naming convention: city/area of interest_date_sensor_merged (e.g. Mekele_29feb16_WV3_w_merged).
- Click Okay.
- Below are is an example before and after the merge:
* Before:
 * After:
- Now all of your imagery is a single layer as opposed to individual tiles. Imagery is merged into one layer because it is quicker to process, easier to manage, and easier to distribute when it is a single layer.
- Image Enhancement:
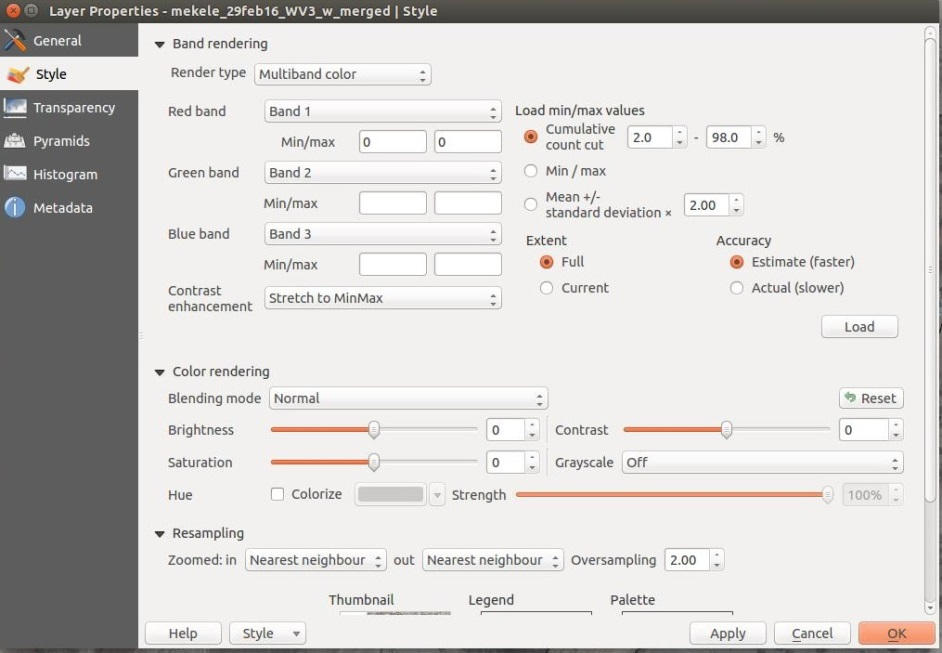
- Right click on your merged layer, and select properties. Then click “Style” from the left. Your window will look similar to this (see below), but may be slightly different depending various factors, mainly which version of QGIS you are running or whether your imagery is a single-band or a multi-band image.
- Under “Extent” select “Current”. You want your extent to be current, instead of “Full”, because it will process the imagery using the Min/Max values from the current extent instead of pulling the numbers from the entire image. This helps keep the imagery from getting to dark or too light by using higher or lower numbers from other areas outside your current extent.
- Under “Contrast enhancement” select “Stretch to Min/Max”. This will use, stretch and apply the enhancement from the Min/Max of your current extent.
- Under Load Min/Max values, select “Cumulative count cut” and adjust it to 0.5% (min) to 99.5% (max) and click “Load”. Usually, this combination will work, however, depending on the image; you may need to adjust to obtain the best results. After adjusting the cumulative count cut, click “Apply” and “OK”.
- When the window closes, pan around the image to ensure the enhancement looks good in other areas. Try to examine areas that will be of interest to the end user (e.g. buildings, roads, etc.) This will allow you to make sure that the user will be able to see the important and necessary features clearly all throughout the image. After you determine if this specific Cumulative count cut works, go back into the style menu, and at the bottom click the button that says “Style” then click “Save Style As”. Save the style file in the same folder as the imagery you are working on. Name it similar to how you named the image (e.g. Mekele_29feb16_WV3_w). The output will be a .qml file.
- Now you will run a custom python script to stretch the imagery and the .qml file. This is done to create a separate output layer that has the style file applied to it, thus assigning the pixels new values. If you do not have the custom python script installed, install it by going to the state-hiu cybergis-scripts repo.
- Open the terminal in the virtual machine and type the following command:
/opt/cybergis-scripts.git/bin/cybergis-script-ittc-stretch.py /ittc_ssd_processing/(imagery folder)/(imagery layer)_merged.img /ittc_ssd_processing/(imagery folder)/(imagery style file).qml /ittc_ssd_processing/(imagery folder)/(imagery output file)_stretched.img –r 1024 3- Example:
/opt/cybergis-scripts.git/bin/cybergis-script-ittc-stretch.py /ittc_ssd_processing/mekele_29feb16_WV3_e/mekele_29feb16_WV3_e_merged.img /ittc_ssd_processing/mekele_29feb16_WV3_e/mekele_29feb16_WV3_e.qml /ittc_ssd_processing/mekele_29feb16_WV3_e/mekele_29feb16_WV3_e_stretched.img -r 2048 3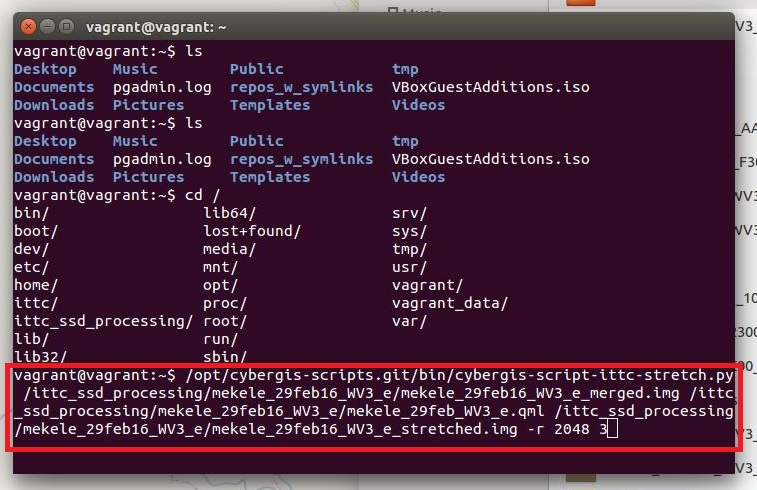
- At the end of the command you see the numbers 1024 and 3. 1024 refers to the number of megabytes (mb) used to process the imagery. The computer can handle higher amounts; however no more than 2048 should be used if you are running more than one stretch script at a time. 3 refers to the number of bands in the image. You will use 1 if the image is a single band (greyscale) image.
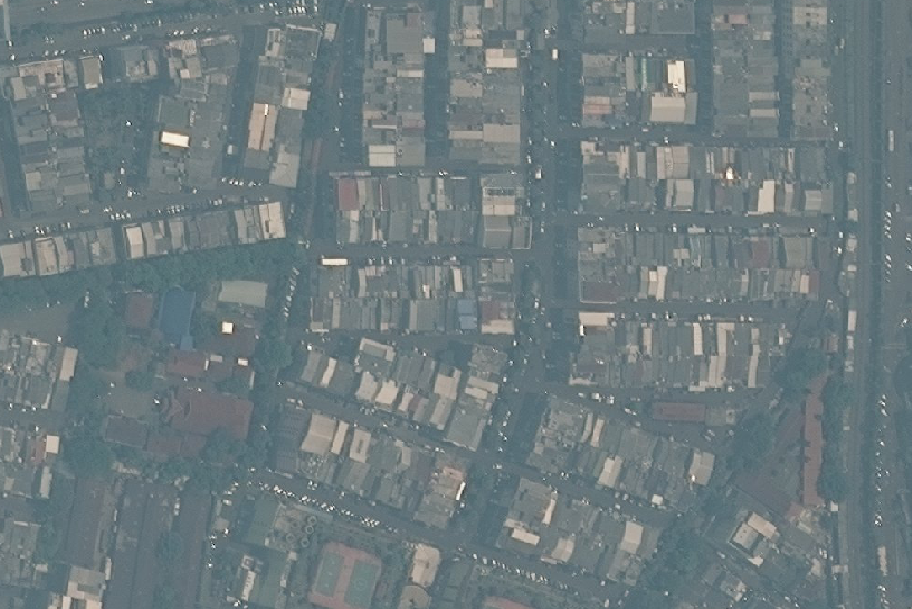
- Below is an example imagery before and after the enhancement:
- Before:
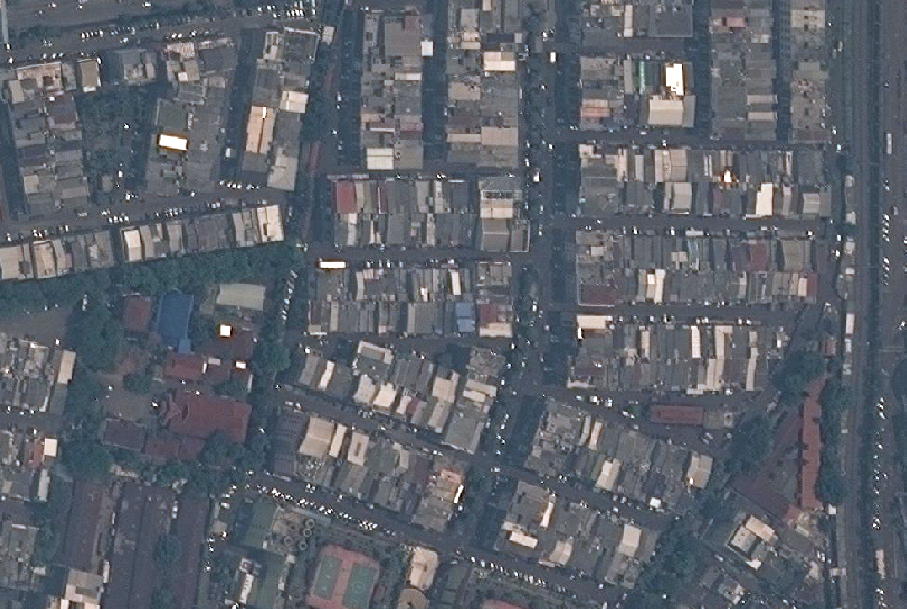
- After:
- Before:
- Right click on your merged layer, and select properties. Then click “Style” from the left. Your window will look similar to this (see below), but may be slightly different depending various factors, mainly which version of QGIS you are running or whether your imagery is a single-band or a multi-band image.
- Building Pyramids:
- In raster data, pyramids are built to improve the performance of your dataset, especially when you are zooming in/out and panning the image. This is crucial for services like TMS (Tile Map Service), which will be hosted on the web, and require faster interaction with the data.
- To begin the pyramid building process, first open the terminal on the virtual machine (if it isn’t open already).
- Next, cd to the folder containing the image you are building pyramids for.
- Now, type the following command:
gdaladdo -ro --config USE_RDD YES (filename)_stretched.img 2 4 8 16- The numbers 2 4 8 and 16 are the zoom levels at which the pyramids will be built
- Example:
gdaladdo -ro --config USE_RRD YES mekele_29feb16_WV3_c_stretched.img 2 4 8 16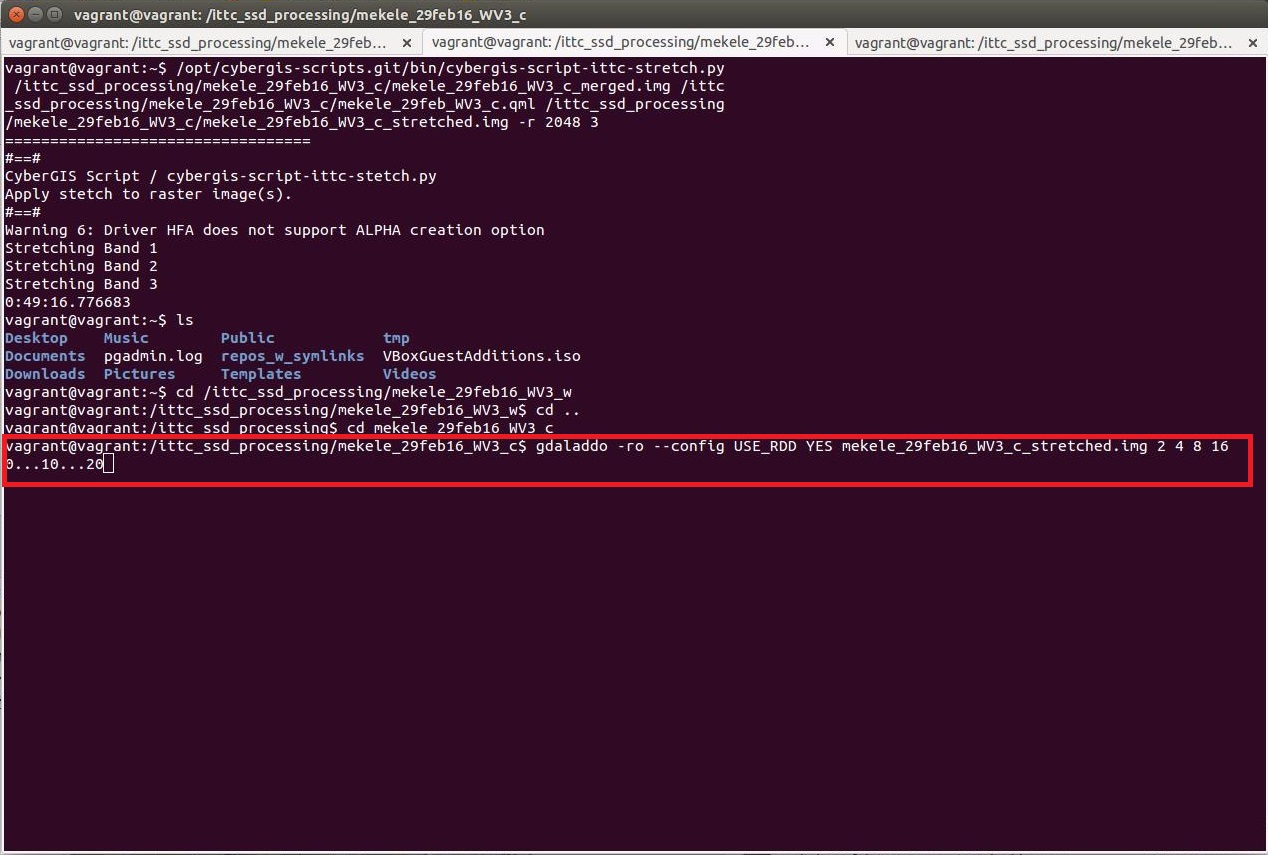
- The imagery is fully processed for our purposes. Next, you will need to transfer the files to the back-end server
- Transferring Files to the Back-End Server:
- To transfer the files to the back-end server drop location, first open the terminal on the host machine.
- Next, type the correct command to upload the files to the drop folder in the backend server.
- In Unix you can use the scp (secure copy) command to securely copy files and directories between remote hosts. The scp command uses SSH to transfer data, so it requires a password or passphrase for authentication. Unlike rcp or FTP, scp encrypts both the file and any passwords exchanged so that anyone snooping on the network cannot view them.
- The syntax for the scp command is:
scp [options] username1@source_host:directory1/filename1 username2@destination_host:directory2/filename2 - tip: To ensure you transfer all the necessary files associated with the .img file, you need to make sure you type the “.*” (wildcard) after the file name.
- Once the files have finished copying, access the back-end server and locate the file. Use the following command from the host machine:
ssh backend-ittc-server- Once on the back-end, use:
cd cybergis/misc/drop/Ubuntu* this is the location of the files you transferred from the machine to the server 6. Next, cd to the following directory:/cybergis/data5/nextview- Now, create a new folder/directory to put your files from the drop location if one does not exist, use:
sudo mkdir (country name)- cd in the new folder:
cd .. /(foldername)- Once in the folder, copy files from drop location to the current folder, use the following command:
sudo cp /cybergis/misc/drop/Ubuntu/(file name)* .* Make sure to include the * followed by a single space and a period. Doing this ensures you will copy all the files needed. - Creating Stores and Layers in GeoServer:
- To create the TMS, you will need to access GeoServer and create a store and layer for your service. Log into the GeoServer. The username is __, and the password is ____.
- To add a store, click on “Add stores” on the welcome page, or slick on ‘stores’ under the data submenu on the left sidemenu, followed by clicking “Add new store”.
- Under “Raster Data Sources”, select “ERDASImg”.
- Name the store in the following format: city-xxmonthxxxx.
- Description is same as name (city-xxmonthxxxx).
- File url: file:///cybergis/data5/nextview/(country folder)/(file name)_stretched.img.
- click the Save button.
- You will see a new page with a row that should display geotools_coverage as the Layer name and a Publish hyperlink as Action. Click on the Publish hyperlink to Edit the Layer.
- In the Edit Layer page change the Name and Title from geotools_coverage to the same name as the store.
- Change “Declared SRS” to ESPG: 900913.
- Change “SUGGESTED_TILE_SIZE” to 256,256.
- Click Save, then go back to “Layers” and locate the layer you just added and click on it.
- Go to the “Tile Caching” tab and uncheck “Create a cached layer for this layer”.
- A popup will appear to “confirm removal of cached contents”, click “OK”.
- Preview you layer by clicking on Layer Preview under the Data submenu on the left sidemenu. Find the correct layer and click on the ‘Go’ link to preview it to make sure it is displaying correctly.
- Editing the Tile Cache Configuration File:
- Now that you have created the store and layer, you need to edit the tile cache configuration file.
- First, from the host machine, open the terminal ssh into the IttC frontend server using the following command:
ssh frontend-ittc-server- Then edit the tilecache configuration file:
sudo vim /etc/tilecache.cfg- Once in the tile cache configuration file, go to the bottom of the page, use shift+g to jump to the bottom.
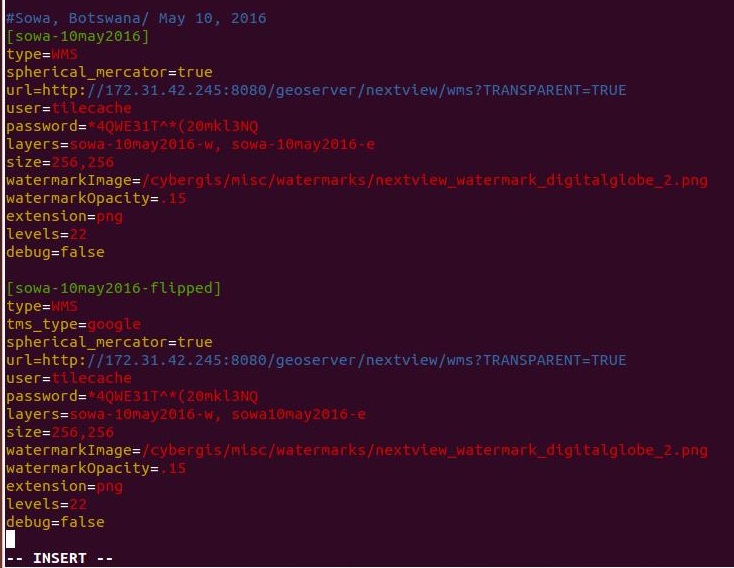
- For ease, copy the previous service information from the blue commented line in this format: #city, country/ XX XX, XXX until the orange “debug=false” of the “flipped” service.
- To edit this file, you must go into editing mode. To do so, use:
i- Right click and paste the information you copied at the bottom of the file, you will use this as a template for your current service.
- Change the name portion in blue at the top (e.g. #Sowa, Botswana/ May 10 2016) and change the date portion to the current date. Change the first section in the green brackets (e.g. [sowa-10may2016]). For the second green bracket, use the same name, but keep the end portion (“-flipped”). You need this for the service to display properly in OpenStreetMaps. Also, these are only the names of the TMS, not the layers themselves. If there is more than one layer in a service, you do not need to do two separate entries (see below).
- Change the “layers” line to match what is on GeoServer. If there is more than piece of imagery for this service, layer them in order from BOTTOM to TOP. So if you have two layers, list the layer that you want on top of the others last (e.g. sowa-10may2016-w,sowa-10may2016-e). Make sure when listing layers, you use the comma and no space.
- Once you have finished editing the tile cache configuration file, press esc. Then to exit press:
:wq (then press enter)- To make sure changes take effect, restart the serve fully proce fully proce fully proce fully proce fully proce fully proce fully proce fully proce fully proce fully proce fully proce fully proce fully proce fully proce fully proce fully proce fully proce fully proce fully proce fully proce fully proce fully proce fully proce fully proce fully procer using the following command:
sudo /etc/init.d/apache2 restart - Testing the TMS:
- Now that the server has restarted, go to GetCapabilities url to locate the service.
- Because all of the services are located here, and are in no particular order, to easily locate your service, use ctrl-f to locate it quicker.
- Copy the url portion of the “flipped” service (e.g. sowa-10may2016-flipped)
- You use the “flipped” service to display properly. It is also the one you will provide the client.
- Go to openstreetmaps.org
- Search for the city/town in the search bar to go to the specific area.
- Once over the correct area, click the drop down arrow next to “Edit” and then click “Edit with iD (in-browser editor).
- On the right-hand side of the page, click the icon for “Background Settings”, go to “Custom”, and enter the url of the TMS followed by “{zoom}/{x}/{y}.png.
- Example url: http://hiu-maps.net/hot/1.0.0/sowa-10may2016-flipped/{zoom}/{x}/{y}.png
-
MapGive/IttC Guidelines and Language:
MapGive/IttC services, language, and guidelines:
City/Town/Region Name, Country
TMS links
tms[22]:http://hiu-maps.net/hot/1.0.0/[file name]/{zoom}/{x}/{y}.png
(Instructions)
Imagery Details
This imagery is from Digital Globe’s ___ satellite, and is made up an image taken on Month, xx xxxx. The image is orthorectified for terrain corrected geographic precision. Additionally, the image has been contrast stretched using a custom stretch and processed into a Tiled Map Service (TMS) for performance.
(add to changeset comments): #MapGive Source=(Sensor Name), DigitalGlobe, NextView, xx Mon xxxx
Imagery to the Crowd Guidelines -Please notify us when project gets posted -If a new project gets posted that uses a TMS previously issued, notify us beforehand.
-
Terminal Commands:
Here you will find a list of all terminal commands for processing the imagery, and other commands you may need to navigate the terminal and various folders along the way.

- Booting the Vagrant virtual machine:
cd ..vagrantcd .. omnitom_osmboxvagrant up - Stretch command:
/opt/cybergis-scripts.git/bin/cybergis-script-ittc-stretch.py /ittc_ssd_processing/(folder name)/(file name)/merged.img /ittc_ssd_processing/(folder name)/( file name).qml /ittc_ssd_processing/( file name) /( file name )_stretched.img -r 1024 3 - Build pyramids:
gdaladdo -ro --config USE_RRD YES (file name)_stretched.img 2 4 8 16 - Copying from drop to “data#” folder:
sudo cp /cybergis/misc/drop/Ubuntu/(file name)* . - Show files in current directory:
ls - Change directory:
cd - Add directory:
sudo mkdir - Remove directory/file:
for directory: sudo rm (directory name)for file: sudo rm –f (file name) - ssh to the back-end; ssh to the front end:
ssh backend-ittc-serverssh frontend-ittc-server - Edit the tile cache configuration file (from the front-end server):
sudo vim /etc/tilecache.cfg - Save and Exit the tile cache configuration file:
:wq (press enter) - Restart the front-end server:
>
sudo /etc/init.d.apache2 restart